Nmap

Nmap is a free, open-source tool for vulnerability scanning and network discovery.

first, it needs open nmap in Kali Linux and type nmap -l team2.pentest.id :

based on that figured, it get the informations about which port is open.

and also it could check with this command nmap – v 68.183.184.165 (ip form team2.pentest.id :

nmap -A 68.183.184.165 ==>

Posted in Uncategorized | Leave a comment

Lab 4 DNS and ARP spoofing

First, it needs to open the SET tool.

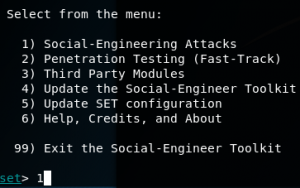
It will appear like this and choose number 1:

Next, choose number 2:

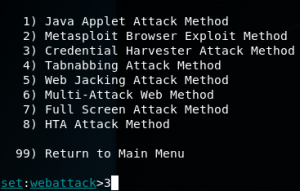
After that, choose number 3:

Furthermore, choose the clone site:

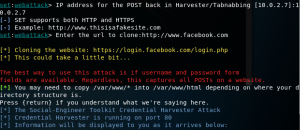
And it will ask to type the IP address (attacker), also clone website:

Before to do an edit in etter.conf, it needs to arp spoofing first.

First, type like this:

Second, type arpspoof –t [IP Target] [IP Gateway] (do not enter it yet):

Third, open new tab for the terminal command and type same like above, but for IP target and IP gateway switch it:

After that, run it both of it.

If it has done, open new terminal command and type “gedit /etc/ettercap/etter.conf”

Change the UID and GID become 0:

After that, scroll down until find “linux” and remove this symbol “#” at part of iptables :

Save it if  has done, type on the terminal command like this:

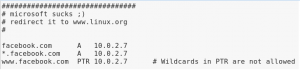
And scroll down until find “Microsoft suck :)” and change the Microsoft to clone website :

Save it if it done.

Type on terminal command:

Choose sniif tab > unified sniffing:

After choose scan the host:
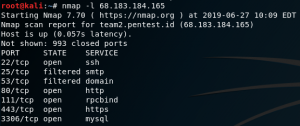
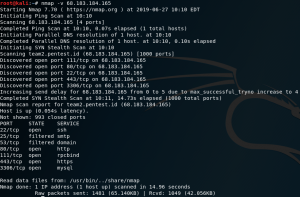
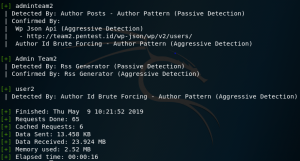
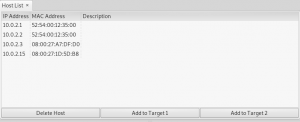
Result:

If it has done, choose the host list. Pick for add target one for target victim and add target two for gateway router:

After that, go to MITM tab and choose arp poisoning:

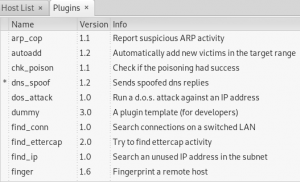
Furthermore, go to pluggin and choose manage the plugins. Choose dns_spoof:

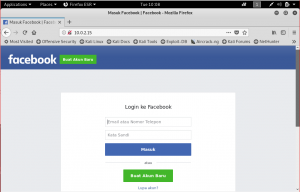
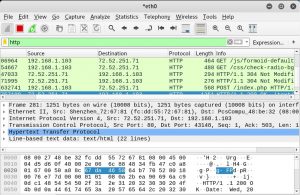
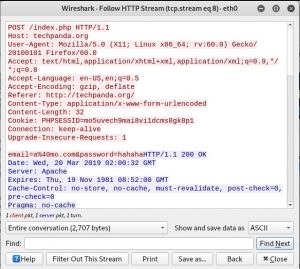
Start sniffing and try check Facebook ping:

And in there is a Facebook clone (CSS not really reloaded in this screenshot):

Posted in Uncategorized | Leave a comment

Social Engineering Toolkit

The Social-Engineer Toolkit (SET) is specifically designed to perform advanced attacks against the human element.

In this case, it will make a clone website to get the username and password from thee target.

Open Kali Linux in VM. After that open Social Engineering Toolkit.

it will appear like this and choose number 1:

next, it will appear like this and choose number 2 :

furthermore, it will appear like this and also choose number 3 :

And last optional number appear like this and choose number 2 :

So, it would ask about the IP address for the post and insert the VM IP address in there.

And also insert the clone website which is Facebook.com for the example.

result will be like this :


Posted in Uncategorized | Leave a comment

Maltego

Maltego is a unique platform developed to deliver a clear threat picture to the environment that an organization owns and operates. This tool for gathering the information.

Maltego is a program that can be used to determine the relationships and real world links between:

  • People
  • Company
  • Domains
  • DNS
  • IP Address
  • Phone Number

In Kali Linux, already have Maltego tool.

First, open the maltego tool and make a new layer at the top right corner. After that, choose domain:

furthermore, it wrote gemscool.com for the URL.

Right click on it and choose the all transforms, it would appear like this:

after that, choose whatever depends on what the attacker needs to know. this is for the example of the result:

Posted in Uncategorized | Leave a comment

DHCP

Dynamic Host Configuration Protocol (DHCP) is a network management protocol used to dynamically assign an IP address to any new node entering the network.

DHCP is an automated method by which any newly added or transferred node in a network can be assigned or reassigned an IP address instantly.

DHCP does the following:

  1. Manages the provision of all the nodes added
  2. maintains the unique IP address of the host
  3. Sends a request to the DHCP server whenever a client/node, which is configured to work with DHCP, connects to a network.

The DHCP server has many duties:

  1. A DHCP server is configured to manage the provision of the IP addresses and is an essential requirement to run DHCP protocol.
  2. for DHCP to operate, the clients need to be configured. When a DHCP-aware client connects to the network, the client broadcasts a request to the DHCP server for the network settings.
  3. The server responds to the client’s request by providing the necessary IP configuration information
  4. The DHCP server is ideally suited in scenarios where there are a regular inclusion and exclusion of network nodes like wireless hotspots.

Dynamic Host Configuration Protocol is known as RFC 2131.


References :

Dynamic Host Configuration Protocol (DHCP). retrieved from https://www.techopedia.com/definition/11337/dynamic-host-configuration-protocol-dhcp


Posted in Uncategorized | Leave a comment

The Harvester

The harvester is a tool for gathering the information about email account, email subdomain, and hostname.

This tool designed to help the penetration tester on an earlier step. the sources support are:

Google – emails, subdomain

Bing Search – emails, subdomains, virtual host

Linkedln – Employee name

etc.

In Kali Linux, this tool already exists and try to run the harvester. after that, type in the harvester like this:

-d means the URL target.

-l means the limits when the tool running for searching the data results:

and -b means the search engine.

furthermore, it needs time for a while and the result would be like this:

Posted in Uncategorized | Leave a comment

Shellshock

Shellshock is vulnerability to get information of the target data and metasploit is the tool.

First of all, it needs two virtual machine which are kali Linux as the attacker and kali Linux backtrack as the target.  After that, the adapter should change to NAT network and it ready to ready to do the vulnerability.

Open the command prompt both of them and type ifconfig to know each ip to do the vulnerability.

Target:

Attacker :

After knowing about the ip address, open the command prompt at kali Linux as attacker and type msfconsole.

Next, type it in the console like this:

After that, type set for rhost, lhost, targeturi:

set rhost (fill the target IP addrees) ==>

set lhost (fill the attacker IP address) ==>

set targetURI  ==>

If done it, type show payload to see all the payload available and choose linux/x86/shell_reverse_tcp like this:

Furthermore, type “check” to know if the vulnerability can exploit or no:

Finally, it can exploit the target:

for example, if it can exploit the target:

Posted in Uncategorized | Leave a comment

WPSCAN

Wpscan is a tool of vulnerability scanner that finds the security issue.

Usually, this tool used to get some data in WordPress which is the username. This tool also could get the vulnerability and fingerprint of WordPress.

first of all, open the tool in Kali Linux which is Wpscan.

after that, type it for example “wpscan –url team2.pentest.id –enumerate u” like this :

furthermore, it will take a long time to wait for an update of the database. after it done, it will appear the username like this:


Posted in Uncategorized | Leave a comment

Arp Spoofing

Arp spoofing is a technique to get the information between two computers which is the password and username when the victim sign in with another website.

First of all, it needs two virtual machines which are two Kali Linux and the adapter should be a bridge adapter.  if you have done it, turn on two virtual Kali Linux and open the command line each Kali Linux.

Kali Linux as the attacker should open two tab command line. The first tab should type :

echo 1 > /proc/sys/net/ipv4/ip_forward

after that, type “arpspoof -t [IP target] [IP gate]”

and open another tab type “arpspoof -t [IP gate] [IP target]”

next, execute both terminals.

furthermore, the attacker opens the wireshark and wait until the target opens the browser for sign in.

if the target open the browser to sign in, and then type the username and the password.

the attacker got the data in wireshark :

and the info data is HTTP which is number 757199:

after that, right click on there and select HTTP stream, the result like this :

The attacker got the username and password which is a@mo.com and hahaha.


Posted in Uncategorized | Leave a comment

Burp Suite Certificate

First, Open the terminal and type “openssl req –x509 –days 730 –nodes –newkey rsa:2048 –outform des –keyout server.key –out ca.der”

After that, we need the RSA and type in the terminal “openssl rsa –in server.key –inform pem –outform der” and the second “openssl pkcs8 –topk8 –in server.key.der –inform der –out server.key.pkc8.der –outform der -nocrypt”

If done with two step above, open the Burp Suite and go to proxy tab then press the certificate button. It will appear like this. For CA certificate choose ca.der and for private key choose server.key.pkc8.der

Furthermore, open your browser and go to preferences on the top right then choose network proxy. Change it like this.

And then, go to privacy and security and press certificate button. It will appear like this and press import.

Choose car.der for the import file

After you are done, open a website with ssl. Go to intercept tab then press forward until website loads.

Result will be like this.


Posted in Uncategorized | Leave a comment